| 일 | 월 | 화 | 수 | 목 | 금 | 토 |
|---|---|---|---|---|---|---|
| 1 | 2 | 3 | ||||
| 4 | 5 | 6 | 7 | 8 | 9 | 10 |
| 11 | 12 | 13 | 14 | 15 | 16 | 17 |
| 18 | 19 | 20 | 21 | 22 | 23 | 24 |
| 25 | 26 | 27 | 28 | 29 | 30 | 31 |
- 링커
- Spring
- String
- DispatcherServlet
- ApplicationContext
- Immutable
- 토비의스프링3.1
- springwebmvc
- lambda
- 메이븐
- IOC
- 컴퓨터시스템
- DesignPattern
- 빌드툴
- 링킹
- ORM
- JPA
- springboot
- hibernate
- 토비의스프링
- beanfactory
- 자바
- exception
- 클린코드
- AutoConfiguration
- FunctionalInterfaces
- java
- gradle
- Kotlin for Java Developers
- 프록시
- Today
- Total
엔지니어로 가는 길
Spring Boot에서 HttpMessageConverter를 설정하는 방법 본문
* HttpMessageConverter가 무엇인지에 대해서는 다음 기회에 다루기로 한다.
WebMvcConfigurer
Spring은 `WebMvcConfigurer`라는 인터페이스를 통해 웹과 관련된 설정을 커스터마이징 할 수 있도록 돕는다.
WebMvcConfigurer
Defines callback methods to customize the Java-based configuration for Spring MVC enabled via @EnableWebMvc.
@EnableWebMvc-annotated configuration classes may implement this interface to be called back and given a chance to customize the default configuration.
Since: 3.1
@EnableWebMvc이 무엇인지에 대해서는 아래 글을 참고하자.
Spring Boot에서 @EnableWebMvc 사용시 주의할 점
@EnableWebMvc - Spring에서 제공하는 어노테이션 - `@Configuration`이 붙은 자바 클래스 설정 파일에 사용될 수 있다 - 이 어노테이션이 붙을 경우 `WebMvcConfigurationSupport` 클래스로부터 Spring MVC 설정을 import
live-everyday.tistory.com
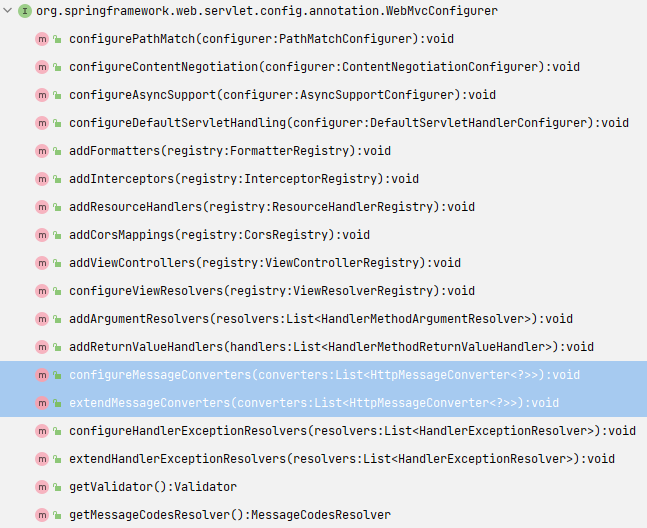
`WebMvcConfigurer` 인터페이스가 가지고 있는 메서드는 아래와 같다.

`HttpMessageConverter` 관련하여 커스터마이징이 필요하다면 위의 두 메서드를 이용할 수 있다.
configureMessageConverters
Configure the HttpMessageConverters for reading from the request body and for writing to the response body.
By default, all built-in converters are configured as long as the corresponding 3rd party libraries such Jackson JSON, JAXB2, and others are present on the classpath.
Note use of this method turns off default converter registration. Alternatively, use extendMessageConverters(List) to modify that default list of converters.
Params: converters – initially an empty list of converters
configureMessageConverter() 메서드의 인자로 비어있는 converter 리스트가 주어진다. 여기에 원하는 컨버터를 추가하면 된다.
@Override
public void configureMessageConverters(List<HttpMessageConverter<?>> converters) {
    converters.add(new MappingJackson2HttpMessageConverter());
}
주의해야 할 점은 configureMessageConverters() 메서드를 통해 컨버터를 추가하면, 디폴트로 등록되던 컨버터들이 등록되지 않는다는 점이다.
/**
 * Provides access to the shared HttpMessageConverters used by the
 * RequestMappingHandlerAdapter and the ExceptionHandlerExceptionResolver.
 *
 * This method cannot be overridden; use configureMessageConverters instead.
 * Also see addDefaultHttpMessageConverters for adding default message converters.
 */
protected final List<HttpMessageConverter<?>> getMessageConverters() {
   if (this.messageConverters == null) {
      this.messageConverters = new ArrayList<>();
      configureMessageConverters(this.messageConverters);
      if (this.messageConverters.isEmpty()) {
         addDefaultHttpMessageConverters(this.messageConverters);
      }
      extendMessageConverters(this.messageConverters);
   }
   return this.messageConverters;
}
`WebMvcConfigurationSupport`의 getMessageConverters()를 보자. configureMessageConverters()를 통해 컨버터를 설정하고, 이때 하나라도 컨버터가 등록이 되었으면 디폴트 컨버터가 추가되지 않는다. 디폴트 컨버터는 그대로 살리고 싶거나, 디폴트 컨버터 중 일부 컨버터를 조작하고 싶을 때는 extendMessageConverters()를 사용하자.
extendMessageConverters
Extend or modify the list of converters after it has been, either configured or initialized with a default list.
Note that the order of converter registration is important. Especially in cases where clients accept org.springframework.http.MediaType.ALL the converters configured earlier will be preferred.
Params: converters – the list of configured converters to be extended
extendMessageConverters() 메서드의 인자로는 설정되어 있는 컨버터 리스트가 주어진다. 새로운 컨버터를 추가할 수도 있고, 특정 컨버터는 제외하거나 설정을 변경할 수도 있다.
@Override
public void extendMessageConverters(List<HttpMessageConverter<?>> converters) {
    converters.stream()
            .filter(MappingJackson2HttpMessageConverter.class::isInstance)
            .forEach(
                    converter ->
                            ((MappingJackson2HttpMessageConverter) converter).setDefaultCharset(StandardCharsets.UTF_8)
            );
}
@EnableWebMvc 없이도 Spring Boot + WebConfigurer 가능한 이유
Spring Boot에서 Spring Boot가 제공해주는 Web MVC AutoConfiguration을 살리면서 커스터마이징을 진행하기 위해서는 아래와 같이 `@EnableWebMvc` 없이 `WebMvcConfigurer`를 구현해야 한다.
@Configuration
public class WebConfig implements WebMvcConfigurer {

    // ...

}
그런데 `WebMvcConfigurer` 인터페이스에 달린 주석을 보면 `@EnableWebMvc`를 통해 이루어지는 설정을 커스터마이징할 때 사용하라고 되어 있었는데 어떻게 Spring Boot에서는 `@EnableWebMvc`없이 `WebConfigurer` 사용이 가능한 걸까?

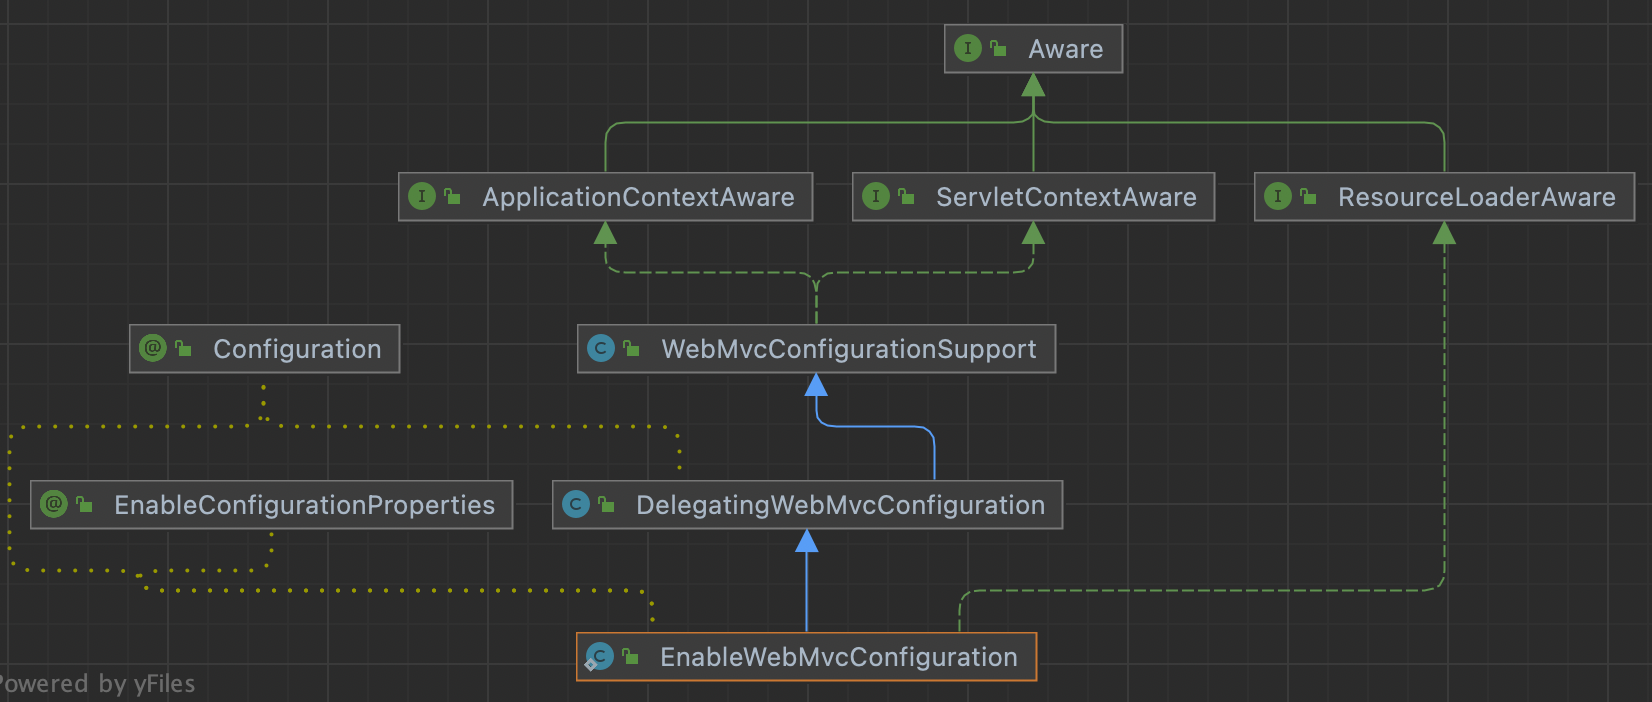
`EnableWebMvcConfiguration`이 `DelegatingWebMvcConfiguration`을 구현하고 있고, `DelegatingWebMvcConfiguration`가 `WebMvcConfigurationSupport`를 구현한다.
`@EnableWebMvc`는 `WebMvcConfigurationSupport`의 설정을 import 하므로 결국 `@EnableWebMvc`를 직접적으로 사용하지 않더라도 `WebMvcConfigurationSupport`의 설정을 사용하겠다고 하면 `@EnableWebMvc`를 사용한 것과 같은 효과인 셈이다.
따라서 Spring Boot의 `WebMvcAutoConfiguration`에서 `EnableWebMvcConfiguration` 설정 파일이 빈으로 등록되므로 `@EnableWebMvc`가 없는데도 `WebMvcConfigurer`를 사용하여 웹 관련 설정을 커스터마이징 할 수 있다.
'프로그래밍 > Spring' 카테고리의 다른 글
| Spring Boot에서 @EnableWebMvc 사용시 주의할 점 (0) | 2022.12.28 |
|---|---|
| Spring의 @Conditional과 Spring Boot의 AutoConfiguration (0) | 2021.10.01 |
| Spring security BadCredentialException의 원인 및 해결 방법 (0) | 2021.08.26 |
| @Bean을 통한 빈 등록시 주의해야 할 점 (0) | 2021.05.17 |
| @InitBinder와 WebDataBinder의 쓰임 (0) | 2021.04.11 |


